Picture this, an email lands in your Inbox. It’s an enquiry from a potential customer.
Do you:
- Say yay to yourself but put off dealing with it until later?
- Respond immediately and hastily often leaving important information out?
- Decide to respond immediately but ponder for hours over what you should write?
- Respond immediately and perfectly every time?
If you answered number 4 this post isn’t for you. If you answered 1,2 or 3 read on, I may have the solution.
Writing email sucks. Some days you’ll be fast and creative, other days words fail you.
There must be an easier way than continuously procrastinating or sending shabby rushed emails.
That’s why you need to create reusable template emails (RTE) on your best days that you can use over and over again. It will save you time and you’ll be confident your responses are the best they can be.
Read more about building an online strategy:
- Top Tools To Stop Your Procrastination And Actually Create A Customer Persona. Read more…
- Are You Neglecting Your Thank You Page? (Plus Examples) Read more…
- How To Write Great Social Media Bios Using The WWHPP Formula. Read more…
- How To Use The Hello Hook Formula To Convert Your Website Visitors (With examples) Read more…
What RTEs (Reusable Template Emails) do you need to create?
Any email that you’ve needed to send more than once is a candidate to become an RTE. Any email that’s slowed down your day as you’ve struggled for the perfect reply should go on to your list.
But right at the top should be the important stuff. The emails that you send as part of your sales process and your customer care.
Get these right and you’ll convert more customers and make existing customers feel your love with your follow-ups.
Writing email sucks. Some days you’ll be fast and creative, other days words fail you. There must be an easier way than continuously procrastinating or sending shabby rushed emails.Click To TweetWhere to start?
Look at every touchpoint you have with your customers. Map out every email you send to them. Each one is an opportunity for an RTE.
- Instant response to an enquiry
- Quote email
- Follow up email sequence
- Notification of shipping/booking
- Thank you email
- Request information email
- Invoice email
- Request testimonial email
- Survey email
Now you have a list you are ready to create your RTEs
Writing an RTE
Because you are no longer having to compose your emails on the go you can spend time crafting them.
Think about:
1. Your style
Are all your emails on brand? Do you use the same language and style in your communications? (We’ll talk about this more next week).
2. Your greeting
How will you start your emails?
Will your audience respond better to a formal ‘Dear’ an informal ‘Hi’ or an in-between Good morning/afternoon/evening?
The way you address the recipient needs to match your greeting.
A Mr or Mrs for your formal (yes some people still do this) or just the first name for an informal audience.
3. Length
Email is a chore. Don’t make it worse for your customers by sending epic emails. Keep them short whilst still including all the required information.
Which brings me to…
4. Content
Don’t bury the lead.
I was waiting for the results of a medical test recently. When the envalope arrived I scanned through the text looking for words that would tell me quickly what the results were. (They were all good).
I didn’t want a long letter I just needed the few words that would give me the information I needed.
It’s painful.
Don’t make your email reader go through this. It’s fine to open with a line of polite conversation but don’t hide what you want to say at the bottom of your email. Get straight to it. Make a checklist of the key information you need to include and rank it in order of importance.
Put the most important at the top and work your way down.
That is until the last line when you need a…
5. Call to action
What should your reader do next? Do they need to book an appointment? Approve a proposal? Visit a site to track their order? Confirm they received the invoice?
Make sure this is visible. You could include it in the last line of your email, you could make the text bold or you could open with it.
Whichever you choose make sure it’s there and unmissable.
6. Sign off
Your sign off will relate to your greeting. A formal sign off could be ‘Yours’ or ‘Kind regards’ an informal one could be ‘Talk soon’ or ‘Thanks.
Once you’ve drafted your emails, go back and edit them. Use a grammar tool like Grammarly or Pro Writing Aid to spot any typos or bad grammar.
When you’re happy with your RTEs it’s time to put them into action.
Saving time on your RTE emails with Text Expander
You’ve done half the work but implementing your RTEs is still cumbersome. You’ve made it easier but there’s still a lot of copying and pasting involved in sending them.
Unless you use a tool like Text Expander.
Text Expander is an app for your computer, phone or tablet. You create snippets that when typed into an email automatically expand to include the full text.
Confused? Here’s how it works
Download Text Expander from their website (there’s a 30-day free trial, pricing starts at $3.33 a month after the trial expires).
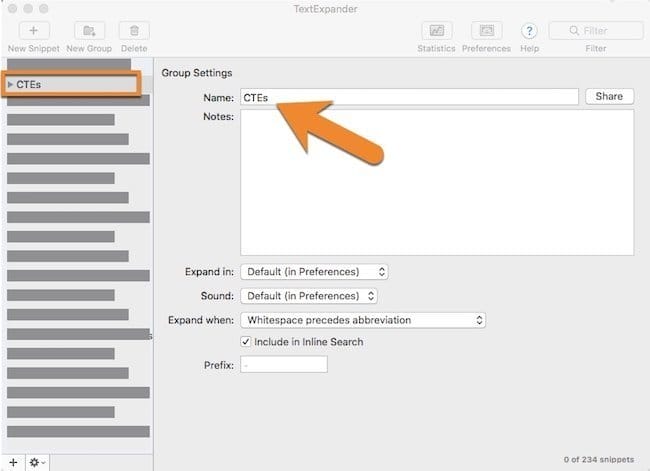
Step 1: Create a group:
Groups are like folders, you can store several snippets in them. You can create them for different types of emails or just have one folder with all your RTEs in it.
To create a group:
Click the folder icon at the top left of the screen

Give your group a name, it will appear in the menu on the left-hand side
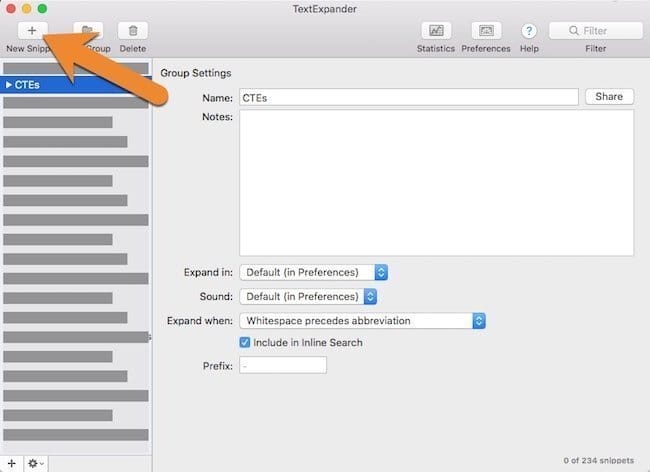
Step 2: Create your snippet
You will need one snippet per RTE you create. This is where the magic is. By adding a couple of buttons you can trigger your full email just by typing a short phrase into the subject line.
Here’s how:
Click on your group name in the left-hand menu to highlight it
Click on the ‘+’ New Snippet icon at the top left of the Text Expander window.
Paste or type in your email subject line
Click the keyboard icon and select ‘tab’ to add a tab stop.

This tab moves the cursor into the body section of your email.
Add your greeting directly after the ‘tab’ icon.
To add a recipient name you need to add a ‘fill in’.
Click on the ‘fill in’ icon and select ‘single-line field’ from the drop-down menu. Fill in the blank to say ‘name’.
When you use the snippet later this will prompt you to add a name.
Now move onto the next line and paste in the body of your email. You can add other ‘fill in’ elements if you have other areas you need to customise.
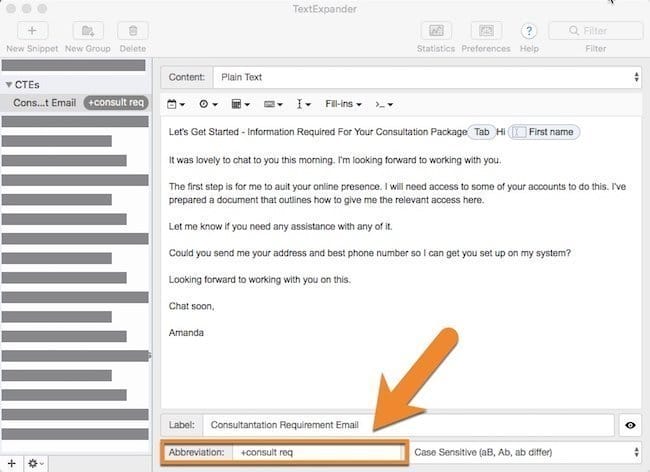
Step 3: Create a shortcode:
Give your snippet a title that will help you find the snippet later if you need to. Now create the shortcode for your snippet.
When creating snippets it’s a good idea to start them with a special character (I use +) this stops them triggering when you don’t want them to.
In the example, I have used +consult req for my email template.
Step 4: Using your snippets
You’ve created your snippet in Text Expander. How do you add it to your email?
Go to your email software and click to compose an email as you usually would (I’m using Gmail in the example).
Type your shortcode into the subject line box. If you have added a ‘fill in’ it prompts you to complete this before your template becomes an email.

And that’s it. Fast email templates.
One last thing…
Even though you have taken the time to craft the perfect email take some time to personalise it for the person you are writing to. It’s this personal touch that your prospects and customers will learn to appreciate.
Get a headstart on Google Analytics 4 & understand the lingo with the GA4 phrase book