How do you take your Instagram pictures? Are you a passionate smartphone photographer or have you advanced to using an SLR or compact camera for your photos?
If you are using a ‘fancy’ camera you have one problem. How do you get your photos from your camera to your phone to post on Instagram?
The good news is that by taking photos on your camera you are ensuring better quality images and you also have lots of options for editing on your PC before sending your pics to Instagram. I’m not going to talk about Photoshop of GIMP today. In this post I’m going to show you two cool tools for cropping and adding text and logos to your posts and two tools to post Instagram photos via your computer.
#1 Adding effects, filters and text to your photos
My photography lecturer in college was a purist. He insisted that we should never crop a photo we had taken, it should be printed as it was taken. This taught us to think more, it was essential we got the framing right when we took the photo. It was good discipline for us students, but not all of us get it right every time.
I often wonder what he would think now if he saw me editing my photos online.
I still aim to take perfect photos every time but when I fail I am happy to crop and make adjustments using Canva or Pic Monkey. They also both give me the option to add text or my logo to my images. To get started upload your photos from your camera to your PC.
Canva
Canva is more a graphic design tool than a photo editing tool. It can help even the most design-challenged people create attractive images. It’s free to use the basic tool and it can help you create more attractive branded images to share on Instagram.
To get started go to the Canva website and sign up. You’ll be prompted to follow a short tutorial, I highly recommend you do this.
Now you are signed up and schooled click on the ‘Instagram post’ template to start your design.
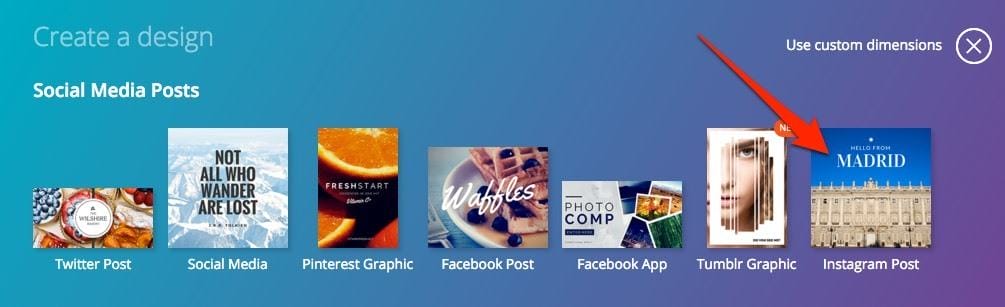
Click ‘Upload’ on the left-hand side to grab photos from your computer (this can take quite some time if you have low bandwidth)
Once the photo has uploaded click on it, it will appear on your design template.
Stretch out the edges until your image fills the frame or keep stretching to select the are of the image you want to feature. Be aware that the more stretching you do the lower quality the final image will be.
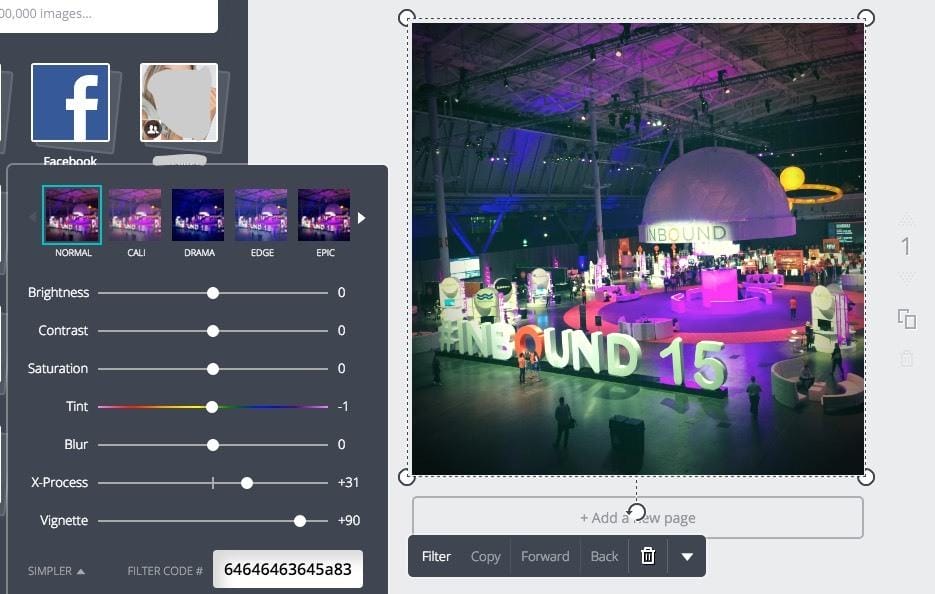
Whilst the image is selected click ‘filter’ in the floating toolbar. This will open a new menu for you.

Select a filter to add standard effects to your image or click ‘more options’ for more editing control. This allows you to adjust brightness, contrast, saturation and more.
To add your logo to your image upload it the same way you uploaded the photo earlier. Click on it and it will appear withing your design.
Resize it by pulling in or out the images and click, hold and move it to reposition it.
Add text to your image by clicking ‘T’ on the left-hand sidebar. You can see in the example below I added the hashtag of the event I was posting about.

When you are satisfied with your work click ‘Download’ and save the image to your computer. It can take quite some time for your download to happen, be patient.
PicMonkey
Canva is great for creating quick images on the go but for a more comprehensive online photo editing tool try PicMonkey (affiliate link). It’s completely free to use and you don’t need an account to get started. I have upgraded my account to Royale to make use of some of the extra fonts, tools and filters that this gives me but it’s not necessary.
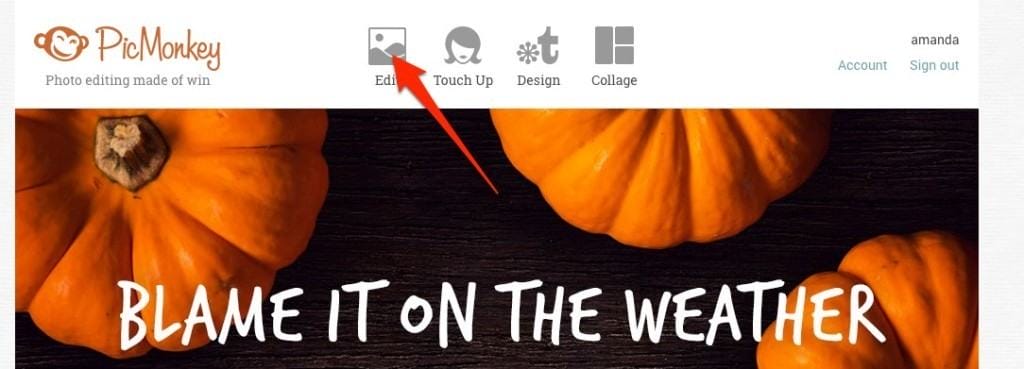
To start editing with PicMonkey visit the website and click ‘edit’. This will prompt you to upload an image from your computer.
To add filters to your uploded image click the ‘magic wand’ icon on the left-hand side.

To add text click the ‘Tt’ icon on the left-hand side. Click the font you want to use and type your text into the box that appears.

You can change the colour and style of the text by highlighting it and selecting a colour or style from the palette.
To resize the text grab a corner of the text box and either pull out to make it bigger or drag it in to make it smaller.

To add your logo click on the ‘butterfly’ icon on the left-hand side.
Click ‘Your Own’ at the top of the menu bar and upload your logo from your computer.
This will place your logo on your image. You can resize it the same way you did the text.
There’s lots of other features on PicMonkey to play with. Check out their blog for inspiration.
To download your finished image click ‘Save’ at the top of the screen.
#2 Sending photos to Instagram from your PC
There are lots of tools that can help you send photos from your PC to your phone where you can upload them to Instagram.
A lot of them are glitchy, even the mac tool ‘AirDrop’ which is seamless when it works sometimes refuses to see my phone or iPad. The two tools below have proved to be the most robust and both are far quicker than emailing yourself a photo.
Dropbox
Dropbox has become such an essential part of my life it’s hard to imagine a time when I didn’t use it to share files.
Recently it’s become my go-to solution for transferring photos from my computer to my phone and visa- verse. You sometimes have to wait a while for images to upload and download, particularly when you are in low internet areas, but it’s by far the most robust tool for sharing.
- Install the dropbox app both on your phone and PC.
- Upload the photo you want to share to Dropbox on your PC.
- Open the photo in the Dropbox app on your phone and then save it to your phone’s camera roll. (screen grab from iPhone app)

Hootsuite
Hootsuite recently introduced what it called ‘Instagram Scheduling’. In reality it doesn’t schedule but it is a nifty tool for sending photos to your phone from your PC.
What I really like about this is that you can write the whole caption on your PC, great for fat fingered people like me. When the photo arrives on your phone the caption is saved to your clipboard. All you have to do to add it to your Instagram post is click inside the caption box and paste.
Here’s how it works:
- Sign up for a Hootsuite account and install the app on your phone
- Add your Instagram account to your Hootsuite dashboard
- Select your Instagram account in the update box at the top of the Hootsuite dashboard
- Write your caption
- Click the paperclip to add your photo and then click either ‘send’ or the calender icon to schedule

If you scheduled your post you will get a push notification to your phone at the allotted time and date.
If you just clicked ‘send’ you will get that notification straight away. You will be prompted to open your post in Instagram.
Add filters if you wish, when it comes to captioning hold your finger down inside the text area and select ‘paste’ when it appears (I use an iPhone, Android instructions may vary)

I think I’ll always prefer taking and creating images on my phone but more serious photographers may want the flexibility that a PC and these solutions give them.
What about you? Are you a iPoneographer or a SLR or graphic design advocate?
Follow my sister business We Teach Social on Instagram for more tips and other stuff.
Get a headstart on Google Analytics 4 & understand the lingo with the GA4 phrase book